
Introduction to Automation
AverLAB provides a very powerful set of automation features, designed to make the process of automating repetitive tasks as easy as drag-and-drop. There are two main uses for automation: during product development commonly used tests can be automated to speed up the development process, and during production complete test suites, where operator instructions, limit checking, and clear pass/fail indications make production tests easy and fast to implement and run.
AverLAB’s drag-and-drop automation is implemented using three steps: define tests and limits, create a sequence, and drag the tests, limits, and actions into the sequence. Once defined, a sequence is executed just like a test–open the sequence and click on the Run button. Even the most complex test sequences can be defined in a matter of minutes, ready to use during development and production.
Creating Tests
The first step to creating a sequence is to create the tests that will be used in the sequence. These are normal tests, in many cases the exact same ones you’ve already been using to test your product during development.
Limits
Limits are optional in a sequence. When used, limits are assigned to specific tests to test the results against the intended performance. The Pass or Fail outcome from the comparison then appears both as text and as an icon, easily visible in the Results group of the sequence. Using the Pass/Fail Action the test outcome can also appear as a Pass/Fail window at the end of the sequence.
To create a new limit, click on the Limits tab and click the New Limit button. The limit appears in a new window. To rename the limit, right-click on the limit in the Limits tab and select Rename. There are several different comparisons available, and the options and fields available vary depending on the type of comparison.
Common Settings
All limits have several common settings that function the same, regardless of the Compare Type.
Tests can report results in various ways: as a level, as gain, relative to a channel reference, or in dBc, dB, or percent. Selecting the value type allows you to choose the best way to do the limit comparison, even if the defaults for the test are different. Depending on the type of test some of these value types may not be useful.
The input channels group allows any combination of channels to be active for the limit comparison. This means that one set of channels can have one limit, and a different limit can be applied to another set of channels, all from the results of a single test. To set the active channels for the limit comparison, open the group and select the desired channels. To use more than one limit on a test, create as many limits as needed and drag them to the test in the Steps group of the sequence.
The Info group shows the name of the limit, a description field, and the date and time the limit was created and last modified. These values make it easier to tell different limits apart, even if the values and names are similar. The description field is especially useful to document how the limit is to be used and any special cases or other details.
| Value Type | Usage |
| From Result | Uses the Default View setting as selected in the test, and is the most common choice. |
| Level | Most useful for level tests, and in other cases where the comparison should use the unmodified test result. |
| Gain | Calculates the difference between the measured level and the generator level. |
| Reference | Calculates the difference between the measured level and the reference level set in the Channel Preferences dialog for each channel. |
| dBc | Forces the maximum measured signal to be zero and measures all other signals relative to that level. Most useful for FFT measurements. |
| dB | All values are in dB, regardless of the measured units. |
| Percent | The compared value is assumed to be in percent. This is most useful for THD+N measurements. |
Compare Type
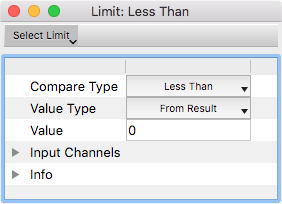
This dropdown box selects the type of comparison used for the limit. Note that limits do not rely on the units of the limit or test result; they are strictly numerical mathematical comparisons.
Test results that are less than the number in the Value field are a Pass, while values equal to or above are a Fail.

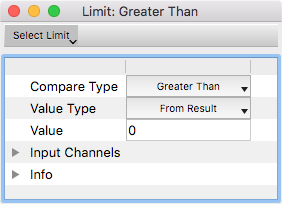
Test results that are greater than the number in the Value field are a Pass, while values equal to or below are a Fail.
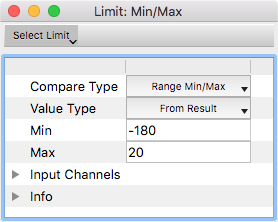
Test results that are above the Min value and below or equal to the Max value are a Pass, while results outside of that range are a Fail.
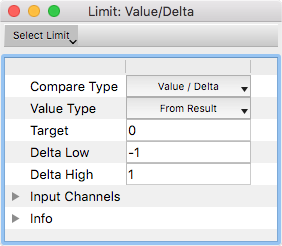
This comparison is similar to Range Min/Max, except that the range is specified as a Target and a Delta Low (below) and Delta High (above) the Target value. This is similar to specification formats like +4 dBu ± 0.1 dB. Test results above the Target minus Delta Low and below or equal to the Target plus Delta High are a Pass. Results outside of that range are a Fail.
Sequences
Creating a sequence is simple: click on the Sequences tab in the Project window and click the New Sequence button. A new sequence will be added to the project with a default name, and the sequence window will open.
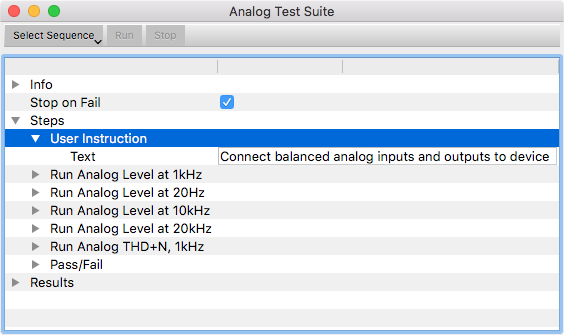
The Steps group contains each of the tests and actions that will be executed, in order, from top to bottom. To add tests or actions to the sequence, drag each one over to the Steps group. The cursor will show a plus sign, indicating that the object can be dropped into the group. By default, the new object will go to the end of the sequence. To reposition it in the sequence, drag it to the desired position. Multiple items can be selected and dragged in one operation. In some cases it may be easier to move items above others rather than move one item down. Note that the Pass/Fail action always appears at the end of the sequence of steps.
Each test in a sequence is actually a link to the original test in the project. This means that any changes made to the settings of those tests appear immediately anywhere those tests appear. This makes it easy to reconfigure sequences to use updated settings without needing to edit every sequence or test.
The info group shows the date and time the sequence was created and last modified, along with a text field for a description. These values make it easier to tell different sequences apart, even if the steps and names are similar. The description field is especially useful to document how the test is to be used and any special cases or other details.
Sequence execution starts at the first step in the Steps section and continues until the end of the list. If limits are applied to one or more tests, selecting Stop on Fail will cause execution to stop as soon as any test does not pass any of the limits set for that test. This is useful to prevent device damage or malfunction when there is an early failure in a sequence. If Stop on Fail is not checked, the sequence will run until the end regardless of the pass or fail status of any limits. This is useful to see the overall status of tests for a device even if some tests exceed their limits. Note that this setting is ignored if no tests are being compared to limits. In this case execution always goes from beginning to end in the list of steps.
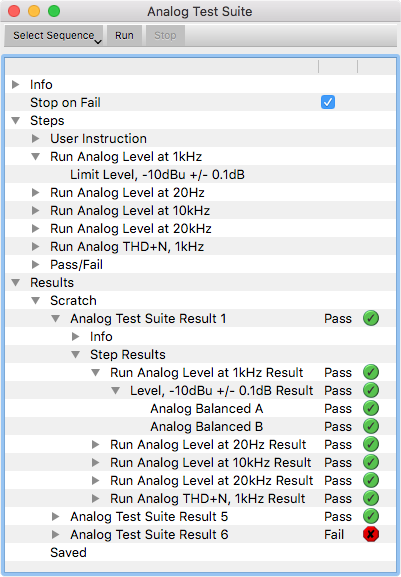
The Results group is similar to what appears in the individual tests, but there are some differences. The results are organized in a tree structure, where each run of a sequence appears at the top of the tree under in the Scratch, Saved, or other folder. Descend into the details of the test result by clicking on the group arrows on the left side. The individual results for each test in the sequence are available under Step Results. Descending further shows the results of any limit comparisons, and descending one more level shows the Pass/Fail status for each channel in the limit compare.
On the right side of each of the results are two columns. The first shows Pass or Fail, and the second displays a graphic green check or red X to make it easy to see the result at a glance.
Double-clicking on any of the entries in the Step Results group opens a Result window, showing the complete results from the test.
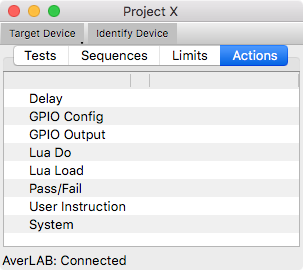
Actions
Actions are pre-defined, commonly used functions that can be inserted in a sequence. There are currently two available Actions: Pass/Fail and User Instruction.
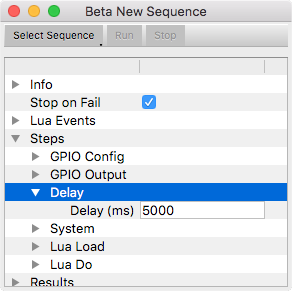
Delay
Insert a Delay action anywhere in a sequence where sequence execution should pause. This is useful to a sequence to give time for an external device, application, or setting change to propagate or settle. The delay time is set in milliseconds, so 5000 ms corresponds to 5 seconds in the example shown.
GPIO
The GPIO port on the back of AverLAB provides up to 8 bits of parallel I/O as well as I2S connections for testing external D/A and A/D converters. In addition, some of the parallel bits can be repurposed for SPI and I2C serial communications. This beta release provides access to some of these features. In particular, only configuration and control of the parallel bits for output is possible in this version.
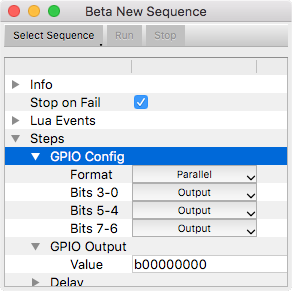
GPIO Config
Insert the GPIO Config action in the sequence before any using any GPIO Output actions. Only one GPIO Config action is required, any number of GPIO Output actions are allowed. Currently, only Parallel is available for the Format. The output direction is set in three separate banks: bits 0-3, bits 4-5, and bits 6-7. Set the banks to the Output direction for the bits you intend to use. By default, all the bits are set as outputs.
GPIO Output
Insert the GPIO Output action anywhere in a sequence where the state of the GPIO outputs should change. Enter the value to be output in the Value field. Any bits that are configured as inputs will ignore the output value, and bits configured as outputs will be set to the specified value. The value field accepts binary, hexadecimal, or decimal numbers. To use binary, prepend a ‘b’ in front of the value. For binary numbers, the value is right-justified, so b00000001 and b1 are both the same value–setting bit 0 high.
To use hexadecimal values, prepend 0x in front of the two digit value. For example, to set every other bit to 1 starting at bit 1, use 0xAA. For hexadecimal numbers, the value is right-justified, so 0x01 and 0x1 are both the same value–setting bit 0 high.
Decimal values range from 0 to 255, and require no prefix.
LUA
LUA is a simple, yet powerful scripting language that is built into AverLAB. Using LUA it’s easy to create custom output reports and log files, connect to remote databases, perform complex mathematical operations on data, and much more. Many of the internal functionality of AverLAB is exposed using global variables and object and helper functions, providing access to test results, raw data, test configuration, and documents used internally by the application.
More information about the LUA language itself can be found at www.lua.org, including reference manuals, books, and papers. Use any convenient text editor to create LUA source files, then load and run them in AverLAB using the actions documented below.
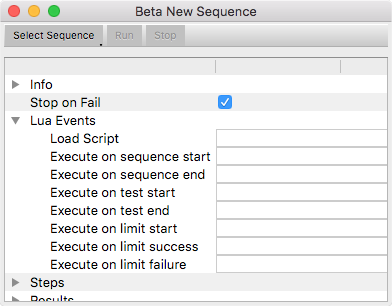
Lua Events
Each sequence can specify an optional set of scripts that are automatically run in response to certain events. Specify a script file and specific LUA functions or statements in the Lua Event group of the Sequence. The function of each field is documented below. Any field left blank is ignored, and no automatic script is run for that corresponding event.
- Load Script –Specify the full filename of the source file to load that contains Lua code that will executed in response to these sequence events. This script file is loaded before the sequence is run. The file is located relative to the Lua script path, which is set in the AverLAB Preferences dialog.
- Execute on sequence start — run at the beginning of sequence execution, before any steps are executed.
- Execute on sequence end — run at the end of sequence execution, after all steps are complete.
- Execute on test start — run at the start of each test in the sequence.
- Execute on test end — run at the end of each test in the sequence.
- Execute on limit start — run immediately before each result is compared to the corresponding limit. All limit events are called for each comparison of a test result, so for multi-channel tests this script is called for each channel for which a limit is specified.
- Execute on limit success — run when the limit comparison specified for the test is complete and the result of the compare is a Pass.
- Execute on limit failure — run when the limit comparison specified for the test is complete and the result of the compare is a Fail.
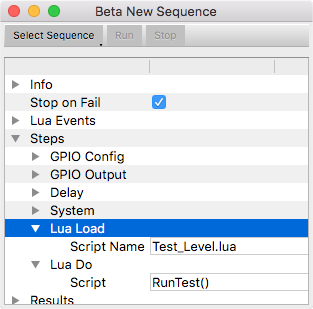
Lua Load
Use Lua Load to load a source file into AverLAB. All of the contents of this file are available in the sequence. Any number of Lua Load actions may be used in a sequence to load multiple files. Once loaded, all of the functions defined in the file are available, and any LUA code in the file that is not inside a function definition is executed as part of the load operation.
Specify the full filename of the source file to load in the Script Name field. The Lua script path is set in the AverLAB Preferences dialog. This makes it easy to organize the scripts for a project–simply create a project folder on your computer, put your scripts there, and set the path to point to that folder. When moving the scripts to another location or host computer, only the Lua script path needs to be changed.
Lua Do
Use the Lua Do action to run LUA code. The Script field may contain any combination of LUA functions and statements. Documentation for the built-in LUA global variables, document objects, and helper functions will be available soon at the LUA API Documentation page.
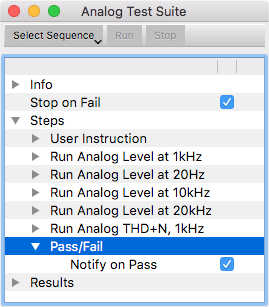
Pass/Fail
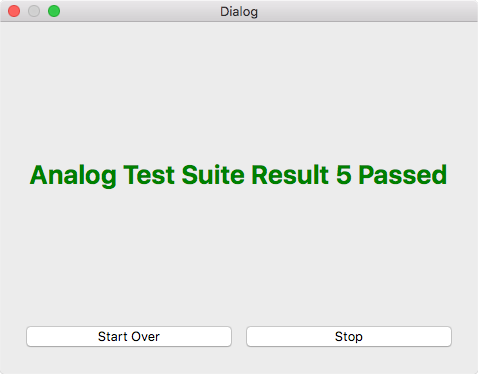
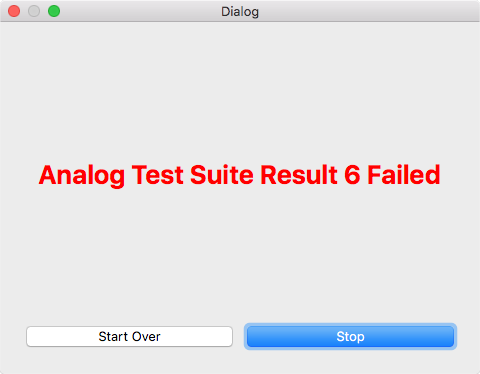
Use the Pass/Fail action to display a window at the end of execution of a sequence that shows whether all of the tests in the sequence passed, or if any test failed its limits. The Pass/Fail action will automatically appear at the end of the sequence.
The Notify on Pass setting is found by expanding the Pass/Fail step in the sequence. If checked, this setting forces the sequence to always display a Pass/Fail window even if all tests passed, and is the default setting. Unchecking this setting causes the action to only display a window if any test failed its limits.
Two buttons appear in the Pass/Fail result window. Start Over will skip to the beginning of the sequence and begin execution again. Stop will end execution of the sequence at this point.
User Instruction
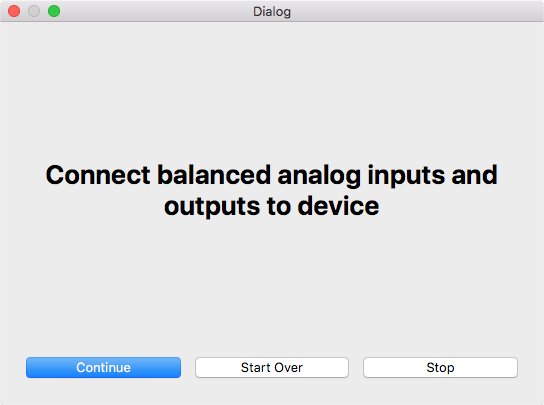
This action provides an easy way to give a test operator instructions during the execution of a sequence. Any number of User Instructions may be inserted anywhere in a sequence. Whenever a User Instruction action is reached during a run, a window appears to display the text specified in the action. For example, a User Instruction at the start of a sequence can prompt the operator to connect a device under test and make appropriate settings to the device. A later Action can prompt the user to change those settings for a different part of the test sequence.
Continue
Pressing Continue resumes execution of the sequence.
Start Over
Press Start Over to skip to the beginning of the sequence.
Stop
Press Stop to end execution of the sequence at this point. To run the sequence again, click on the Run button at the top of the Sequence window.
System
Insert the System action in a sequence to run an external application. A sequence can contain any number of System actions; insert them wherever needed as part of a test sequence.
When run as a System action, command-line programs do not display any output, while windowed applications will appear normally. When specifying a windowed application use the path to the actual executable for the program, which is not always the same path as the icon used to start it normally. For example, on MacOS, you may have to right click on the application, choose “Show Contents”, and navigate to the Macos folder to locate the executable. In all cases, specify the entire path to the application, along with any required command line parameters.

The System action will start the command before continuing sequence execution. In this case the application will run in “asynchronously” with the sequence–they run in parallel. Thus, the System action starts the new application, and it will terminate as it would normally when run from the command line or by double-clicking its icon.
Checking Pause until complete will cause the sequence to pause until the program completes its operation and terminates on its own. In this case the application will run “synchronously” with the sequence–the sequence will pause, the command will run, then the sequence will continue. This is useful for applications that set configuration settings for a DUT that are needed for the next step in the sequence, for example.
In some cases you may need an application to run asynchronously for several steps in a sequence before terminating. One way to accomplish this is to start the command normally, and after the step when it is no longer needed, insert another System action. Set the Command field to the same value used to start the application, and check Kill running command. This will cause AverLAB to terminate the matching application at that step in the sequence.